Showing posts with label gluten free. Show all posts

3.19.2012

Product Review: Hail Merry Raw Snacks

Let me begin by saying that I absolutely adore this company. 

It's rare when I come out in a product review and say that just love a company. A product? Yeah, sometimes, but not usually a company. 

I think Hail Merry does such a great job at what they do - a lot of time, raw snacks can be a hit or miss - and in my experience, I've have a lot of misses. Not here. They know what they are doing.

I had tried both flavors of their raw macaroons before - cocoa and original - and loved them. Honestly, they are probably the best macaroons I've ever eaten. They have a strong maple flavor, are the perfect size, and are just overall delicious. Great coconut flavor. And of course, how can you go wrong with chocolate? (The answer: you can't). Both flavors are wonderful and I highly recommend that you run to your nearest Whole Foods and pick up a bag or two. Or three. 


The nuts that they sent for me to review were new for me, and I was excited to try them. I was expecting nothing but the best. 


These were the Vanilla Maple Almonds. Oh. My. Goodness. 

The maple was the first flavor to hit me - it was very strong, and very yummy. The vanilla was also a strong flavor, and it paired well with the maple. I devoured this package right after receiving the package of snacks. These lasted maybe 10 minutes - if that! So good.  I definitely recommend them. 

Hail Merry also offers a wide variety of other raw seasoned nuts, like Orange Rosemary Pecans, Lemon Thyme Pecans, Chimayo Chili Pecans, and Salt N Black Pepper Sunflower Seeds. They also offer something they call "Grawnola" - or raw granola! If only my Whole Foods sold those babies. 

They also offer chilled raw "Miracle Tarts," which I want to try, but my Whole Foods doesn't sell those either. Darn. That Lime Tart is totally calling my name.

There are a few reasons why I love this company. First, they have great packaging and I love their slogan, "Feed your body royally." Secondly, all of the products that I've tried have been great. Third, they use a lot of coconut oil, which is a healthy fat for your body. Learn more about coconut oil/butter here. And it's yummy. And no refined sugar! 

Overall, great products and great people. I highly recommend trying these products for yourself if you haven't already!

The Daisy Rating
5/5 daisies

I would also like to congratulate Hail Merry on receiving what I think may by the first perfect score I've given out on a product review! 

What is your favorite raw food snack?
Much love, 

3.17.2012

3 Ingredient Pesto Rice

Hey loves! <3 Have you entered my giveaway for Lucy's cookies yet? IT ENDS TONIGHT AT 11PM EST! Get entering!

I realized today that I never post themed food for holidays. I didn't do much around Christmas, when a lot of bloggers were crafting all sorts of Santa & Rudolph themed treats. I also didn't do anything for Halloween. Or Thanksgiving. I want to change that!

Although I decided this about an hour ago when I woke up from my nap (best nap ever), I remembered I made some pesto rice for dinner last night in my rice cooker. Talk about yummy. It's not exactly cute and it's not shaped like a leprechaun or a pot of gold, but it is definitely delicious. My ode to St. Patty's Day will come tomorrow when I host at St. Patty's party for my residents in the dorm!

The Recipe Project
Have you joined yet? Click to read more about it!
Before we get to the rice - an update on the Couch to 5k challenge!

I'm not gonna lie, I'm a little disappointed with myself. This past week I was feeling really good on the first two days, where my running routine on the first day consisted of:

  • Brisk 5 min. warmup walk
  • Jog 1/2 mile (or 5 min)
  • Walk 1/4 mile (or 3 min)
  • Jog 1/2 mile (or 5 min)
  • Walk 1/4 mile (or 3 min)
  • Jog 1/2 mile (or 5 min)

And on the second day: 
  • Brisk 5 min. warmup walk 
  • Jog 3/4 mile (or 8 min)
  • Walk 1/2 mile (or 5 min)
  • Jog 3/4 mile (or 8 min)

Honestly, my legs didn't hurt at all during these workouts. I was pumped, and I didn't even have to stop to take a break during the 5 or 8 minute running sessions! I was ready for Friday to come, when my workout would consist of:

  • Brisk 5 min warmup walk
  • Jog 2 miles without stopping (or 20 min)
Yes, I was intimidated, but I wanted to reach that goal. Then...it didn't happen. I managed to run a complete mile before having to stop, and then I walked/ran the last mile in alternating increments. It was hard, and my shins hurt a little more afterwards than normal. 

So now I'm feeling bummed. 

That's not to say I haven't made progress; I know I've been doing really well, and running that mile was 1/4 mile longer than the distance I ran in the previous workout, which is still good. I just continue to get nervous thinking about my upcoming 5Ks and wonder if I'll be able to push through it. 

I meant to run outside today, because the weather was beautiful and I still need to figure out my Garmin, but exhaustion hit and I needed to take a nap. So I did. A nice, long, nearly 5 hour nap, actually! I plan on doing some Jillian DVDs before bed tonight, so at least I get somewhat of a workout in today.

Okay, without further ado, my recipe for pesto rice! Yummy.


3 Ingredient Pesto Rice
Ingredients
1/2 jar basil pesto (approximately 4.4 oz.)
1 1/4 c. rice of choice
Water

Directions
1. Cook rice and water according to package directions, depending on what rice you choose to use. I used Arborio rice because that's what I had sitting around.
2. Once rice has been cooked, fluff it with a fork, and then mix in pesto. Stir until rice is covered.

I'm not sure what could be easier than that. Of course, you could make your own pesto, but when you are a college student who needs to save money (or needs to learn to save money, instead of buying tons of food, like me...), jarred pesto is the way to go. Especially when you get a jar in the mail from your foodie pen pal and want to devour the whole jar because its the best pesto you've ever eaten :)

I served it with some steamed baby carrots, drizzled with honey. I've been on a honey kick recently. So yummy!

Alright folks, that's all for now - have a lovely rest of your St. Patty's Day!
Much love,

3.15.2012

Product Review & Giveaway: Lucy's Gluten Free Cookies

I think it's time for another giveaway, don't you? :)


When I heard about Dr. Lucy's new line of gluten free/vegan cookies, I knew I had to try them. I had tried the chocolate chip cookies once from Starbucks and thought they were delicious, so I knew I was bound to love the new Maple Bliss, Chocolate, and Ginger Snap varieties! Lucy's was very generous, and sent me six boxes of the new flavors to review - 2 of each flavor! Isn't the packaging adorable?


Maple Bliss
This was my favorite flavor. Reminiscent of pancakes, the maple is strong but not overpowering, and the cookies (much like all of Lucy's flavors) are very crunchy and satisfying. Nice and sugary. It also reminds me of eating maple sugar candies, the maple sugar shaped like acorns? Does anyone know what I am talking about? Delicious. You would have no idea this cookie was gluten free!


Ginger Snap
I also have a soft spot for gingersnap cookies, so these were great. I loved that there were whole pieces of crystallized ginger in the cookies; they added an extra punch that I was not expecting. I loved the strong ginger flavor, and the added ginger pieces made these a better alternative to your typical gingersnap cookie.


Chocolate
How can you go wrong with chocolate? These cookies have a solid chocolate flavor and seemed to be the favorite among my friends. Not much more I can say about these. They were yummy!

Overall: The regular cookie connoisseur would have no idea these are gluten free. In fact, my friends couldn't tell; I took a box of each flavor to my staff meeting on Monday, and my team loved them! One RA even said "tell those people they get a 10/10, because these are really good!" They get a thumbs up from everyone here in Ohio :) They are very crunchy, and even though I'm a half-baked cookie kinda girl, I really liked these. I also like that you can eat three cookies for 120 calories - it makes me feel like less of a fatty when I eat multiple!

The wonderful people at Lucy's is offering YOU the chance to win one box of each of their new flavors! One lucky PD reader will win, and here is how you can enter (leave a comment for each entry!):


1. MANDATORY- Tell me what your favorite Lucy's cookie is, or which flavor you want to try the most! 

Want more ways to win? 

2. Follow Lucy's and Passing Daisies on Twitter 
3. Subscribe to Passing Daisies by email
4. Follow Passing Daisies on GFC/Blogger
5. Follow me on Pinterest & repin something from the board "Passing Daisies" 
6. Like Passing Daisies on Facebook
7. Like and stumble through Passing Daisies on StumbleUpon 
8. Tweet about this giveaway and tag @cityxlights13 as well as linking to the giveaway (can do this once per day for bonus entries)
9. Pin this post on Pinterest

There you go! Giveaway ends on SUNDAY, MARCH 18TH at 11:00PM and the winner will be announce the next day (Monday, March 19). Winner will have 48 hours to contact me or another winner will be chosen. Please leave a valid email address with your first entry. 

Thanks guys! Have a lovely day! 
Much love,

2.03.2012

Product Review: La Tortilla Factory

Do you have a hard time finding quality tortillas? 


I know I do. 


I have seriously stood in the international aisle at the grocery store for 10 minutes, just reading all the ingredients on all the different brands of tortillas. You know what really sucks? All of them have lard and leavening with aluminum. 


That's why, when I was contacted my La Tortilla Factory to review their products, I was really excited! This company does not use either of those ingredients and are much healthier for you than your traditional tortilla. 


I was sent three of their products to review: 100 Calorie Whole Wheat, Fiber & Flax, and Handmade Style Corn Tortillas. 


Ingredients: water, stone ground corn masa flour, wheat gluten, contains less than 2% of each of the following: sea salt, aluminum free leavening (sodium acid pyrophosphate, sodium bicarbonate, corn starch, monocalcium phosphate ), guar gum, cellulose gum, fumaric acid, trace of lime, to maintain freshness (sorbic acid, calcium propionate, potassium sorbate).


Ingredients:  water, whole wheat flour, cellulose fiber, wheat gluten, raisin juice, contains less than 2% of the following: golden flaxseed, cultured wheat (cultured wheat with added vinegar), aluminum free leavening (sodium acid pyrophosphate, sodium bicarbonate, corn starch, monocalcium phosphate), sea salt, vinegar, calcium carbonate, guar gum, dough conditioner (sodium stearoyl lactylate), xanthan gum, to maintain freshness (sorbic acid, calcium propionate).


INGREDIENTS: WATER, STONE GROUND YELLOW CORN MASA FLOUR (CORN MASA FLOUR, CELLULOSE GUM, GUAR GUM , FUMARIC ACID , SORBIC ACID , CALCIUM PROPIONATE, TRACE OF LIME), CELLULOSE FIBER, CONTAINS LESS THAN 2% OF EACH OF THE FOLLOWING: GOLDEN MILLED FLAXSEED, GUAR GUM, ENZYME, TO MAINTAIN FRESHNESS (SORBIC ACID, CALCIUM PROPIONATE, POTASSIUM SORBATE).


I used the Fiber & Flax Corn Tortilla to make a wrap with almond butter, almonds, fresh cherries, and chia seeds. The tortilla itself was very delicious and extremely hearty - with only 45 calories per tortilla! I would recommend using this with a more savory dish, though - it didn't mix to well with the peanut butter (my bad!) This would be great for tacos! 


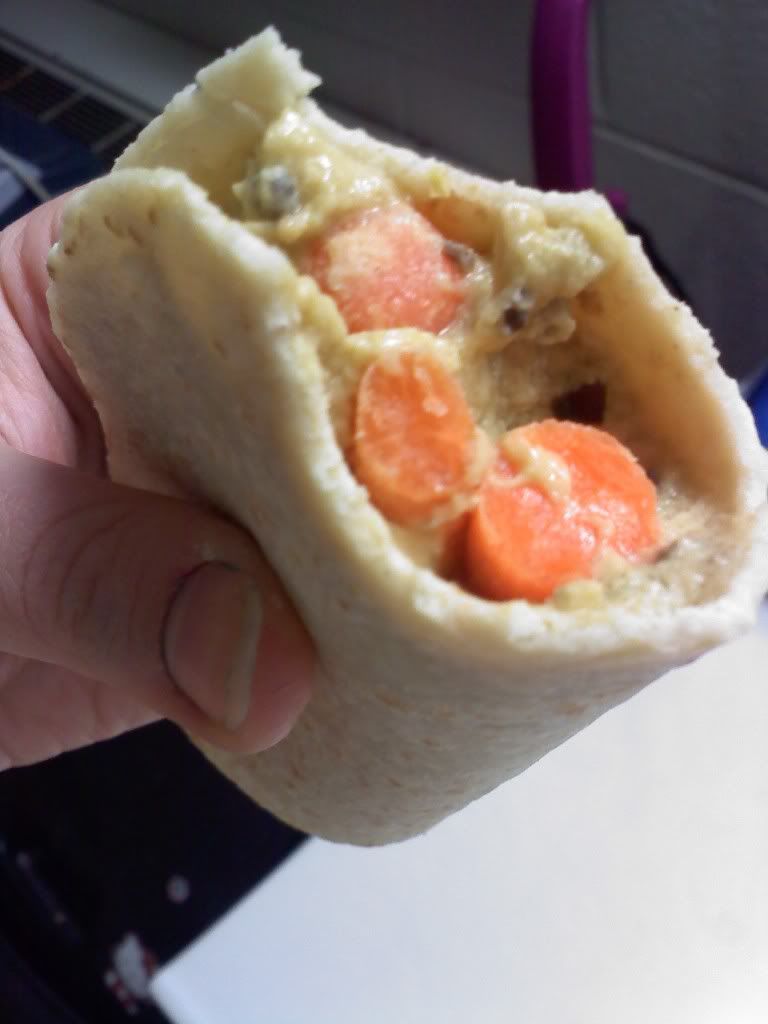
I used the Handmade Style Corn Tortillas to make a hummus and carrot wrap. This was really delicious as well! It is a bit thicker and more substantial than the Fiber & Flax, but was the same size and had double the calories. Very tasty. 

Finally, I made another wrap with the 100 Calorie Whole Wheat Tortillas - and they are HUGE for only 100 calories each! These were by far my favorite. I pus some Peanut Butter & Co. Cinnamon Raisin Swirl pb on it with some extra raisins for a snack. Very soft and delicious. 

The Daisy Rating
4/5 daisies

Overall, great tortillas. I just can't say how happy I am with their ingredients. No more standing in the grocery aisle forever trying to decide what to buy! 

Much love,

1.24.2012

White Chocolate Strawberry Truffles

**CONGRATS TO Art You Dream About, the winner of my Goodbelly Challenge giveaway! Please email me your info so I can mail those coupons out to you!!**

Sometimes, all anyone needs is chocolate. 

Yes; I may have a small large addiction to it, but... it's okay, right? Just eat it in small quantities?! :)

If you are a chocolate lover like me, you will love these truffles. The center is very ooey-gooey, but if left in the fridge for a couple days, it will became harder and more truffle like. You can do whatever you want, they are good both ways - it just depends if you want them to be more cherry cordial-like or truffle like! 

White Chocolate Strawberry Truffles
Ingredients:
1 c. chocolate chips, melted
1/2 c. vegan white chocolate chips (or regular white chocolate if not vegan)
1 T. almond milk
3 1/2 - 4 T. strawberry jelly
Chocolate molds
Optional: luster dust

Directions:
1. Prep chocolate molds with luster dust, if using. Just dust all around with a clean paintbrush.
2. Melt chocolate chips on a saucepan or in the microwave. Spread a layer of chocolate all around the bottom of the molds with another paintbrush. Make sure everywhere is covered!
3. Melt white chocolate in a saucepan. Once melted, add almond milk and jelly. Stir until the mixture is all melted together.
4. Fill chocolate molds with filling, almost to the top. Just leave a little bit of room so the tops can be covered!
5. Take remaining melted chocolate and, using a spoon, pour just enough chocolate over the top of each mold so that all the edges are covered with chocolate. This will prevent the filling from oozing out of the edges when removed from the mold.
6. Place in the fridge and all to chill until chocolate is fully hardened.
7. To remove chocolates from mold, turn right side up and smack on a hard surface. Chocolates should pop right out.


On another note, I received my prizes from Kels and Heather recent giveaways! Thanks ladies! I received a bunch of protein and fruit bars and protein powders from Kels, and some SeaSnax (Toasty Onion flavor) from Heather! I love all of them - and I'm honestly surprised I enjoyed the protein powders and the SeaSnax. They are super great!

School has been a blur recently. My Writing for the Media teacher told me I know everything he'll be teaching, so I'm taking my midterm on Thursday (yikes!) and turning in my writing portfolio in a week. Then I don't ever have to attend the class! How awesome is that!!

On a sad note, I resigned from leading Xavier Navigators. I LOVE my small group. However, I feel I should step down and get my personal life together before continuing to lead them. As you can imagine, this was an extremely difficult and stressful decision (over the course of a couple months) and involved a lot of crying :( Oh well. Hopefully it was the right choice!

I love you all - have a great day!
Much love,

1.03.2012

Almond Butter Truffles


I have recently discovered a passion for making chocolate truffles. 
They are so incredibly easy to make, it's ridiculous! All you need is a mold, some chocolate, and something to fill it with! 
I will be posting two recipes for truffles. First up: Almond Butter Truffles. Why? Because I love nut butters, and this is a great alternative to peanut butter!


Almond Butter Truffles
Makes approximately 16 truffles
1 c. chocolate chips, melted
2 T. almond butter (I used Earth Balance's almond butter)
2 T. honey or agave nectar
1 T. powdered sugar
1 t. almond milk
Chocolate molds
Optional: luster dust

Directions:
1. If using luster dust, take a small paintbrush and paint the dust on the bottom of the mold, wherever you want the chocolate to be colored. Then take a larger paintbrush and spread melted chocolate in each mold until completely covered.
2. While that is setting up, combine the almond butter, honey/agave, powdered sugar, and milk in a small bowl.
3. Please approximately a teaspoon of the almond butter mixture into each mold. Cover with melted chocolate.
4. Allow to set until chocolate is completely hardened. I placed mine in the fridge overnight, but you can also put it in the freezer to speed this process up.
5. To remove chocolates, turn mold upside down and whack it on the counter-top. Chocolates should pop right out. Store in the fridge.


What is your favorite kind of truffle? 
I like fruity flavors, like raspberry and key lime! 

Much love, 

12.19.2011

Vegan Sweetened Condensed Milk

I didn't think vegan sweetened condensed milk existed. How on earth did you make it, anyways?

Well, after a bit of searching, I found a recipe that seemed pretty reliable and easy to make. You know what? It turned out great! My recipe is just a halved version of the original. Try it for yourself. I think you'll really like it!


Vegan Sweetened Condensed Milk
Based on this recipe.


Ingredients:
1 can coconut milk
1/4 c. agave nectar

Directions:
1. In a medium size saucepan, combine coconut milk and agave. Heat over medium-low heat until the mixture beings to bubble, then continue to cook until mixture is reduced by half.
2. Cool to room temperature and store refrigerated until ready to use.

This is ridiculously easy to make, but it does take quite a bit of time to reduce. Just have patience. It will be worth it in the end! It is thick, creamy, smooth, and really, really good.


Soon I shall be posting a recipe for Chocolate Chip Cookie Dough Cupcakes in which you use this condensed milk. Check back for the amazingly sinful recipe!

What are your plans for the holidays?
Much love, 

12.06.2011

Orange Cranberry Sauce

This is the cranberry sauce I served for Thanksgiving this year. So delicious! I love cranberry and orange together, so this was the perfect combination for me. Plus, it's a little different than normal because of the maple flavor that the maple syrup gives it. 


Try it out for yourself!


Orange Cranberry Sauce
Ingredients:
3 c. fresh cranberries, washed and drained
1/2 c. maple syrup
Juice of 1 orange

Directions:
1. Place all ingredients in a medium sauce pot and bring to a boil, stirring often.
2. Cover pot with lid and allow to cook for approximately 10 minutes, or until all the cranberries have popped.
3. Remove from heat. Using a potato masher, mash cranberries until you can no longer see any whole cranberries.
4. Allow to chill for at least 1 hour before serving.

Do you eat cranberry sauce on Thanksgiving? Do you make it or eat the jellied cranberry sauce in a can?
Much love,

12.03.2011

[Guest Post] International Flare: Quick Easy Dinner Ideas for the Winter Table

Hey everyone! I was recently contacted by a reader about writing a guest post for the site - of course I said yes! Please welcome Melissa C, she writes about about food for the Blog Content Guild. Enjoy her post!

Winter is finally here and nothing comforts like a warm plate of hearty root vegetables. This season let them shine as a main course and not just a side dish by giving them some international flavor with this quick easy dinner recipe.

If the house is a little nippy and you want to make it toasty, roast root vegetables in the oven with herbs and oil for a lovely vegan side dish. If you have extra time, though, slow cooking in a crock-pot is a great way to yield the perfect consistency and robust flavors of your ingredients. And, as a bonus, they both save for leftovers nicely.

Maybe you’re planning something special and you want to incorporate an exotic zing, try this recipe for winter root vegetable curry.

Note: This image is not a replica of the recipe below. Image source.

Winter Root Vegetable Curry
6 cloves of garlic
1 (2-inch) chunk, peeled fresh ginger
1 medium yellow onion, diced
1 bay leaf
1 cinnamon stick
4 tbs. coconut oil
2 tsp. Madras-style curry powder
1 c. canned, diced tomatoes
1 1/2 c. plain coconut yogurt
1 c. water
2 turnips, cubed
2 large carrots, cut into 1-inch chunks
1 butternut squash, seeded and cubed
1 sweet potato, cubed
1 can chickpeas, rinsed and drained
1 lemon, juiced
Sea salt and freshly ground black pepper to taste
Serve with favorite rice, maybe Basmati or Jasmine

Puree the garlic and ginger in a mortar and pestle or mini food processor and set aside. Heat coconut oil in a large skillet and add onion, stir till golden and translucent. Stir in bay leaf, curry powder, cinnamon, ginger-garlic paste and let combine for about a minute then add tomatoes and yogurt. Let this cook, while stirring for a good 7-9 minutes. Now it’s time to add the vegetables, water and salt and pepper, bring to a boil, then cover and lower a tad to a simmer, stirring occasionally for another 10 minutes. Go ahead and add the chickpeas, bring to a boil again and season the dish with curry and lemon juice. Serve over cooked rice and enjoy!

There are any number of variations you can make to this dish with different winter veggies based on availability. Just note to add them for the appropriate cook time. Quick easy dinner recipes like this one are fun and great crowd pleasers; try this one tonight!
-----
Thanks again, Melissa!

I think the idea of hosting guest bloggers is a fabulous idea, and recently I have been under so much stress from school that I have barely had time to keep up with the site. Because of that, I am currently looking for some people to write some guest blogs for me! Topics can be anything you want, although seeing as it is nearing Christmas, holiday/seasonal posts would be great! Please email me if you are interested in writing! Thanks so much!

Much love,

11.18.2011

Hearty Lentil & Split-Pea Soup

As winter begins to set in and nights grow colder, cravings for soup start to haunt you. I love soup. It's all I want and the first thing I look for whenever I eat at my cafeteria right now. 

I have especially fond memories involving split pea soup. As a child, my mom and I would bundle up in our winter clothes, walk to Krogers, buy some split pea soup off the hot bar, and sit on the snow covered hill where we would eat our soup. 

I've always loved split pea soup. It's hearty and delicious, that's for sure. Here is a recipe I tried a couple weeks ago.. and it was ah-ma-zing!


Hearty Lentil Split-Pea Soup
Based on this recipe
3 T. olive oil
1/2 large white or yellow onion, diced
2 large carrots, diced
5 cloves of garlic, minced
2 fresh bay leaves
salt and pepper to taste
1 c. dried split peas

1 c. dried lentils
8 c. vegetable broth
juice of one lemon


1. Heat up oil in a large pot. Add the onion, carrot, garlic and bay leaves. Sautee together until onions and carrots are soft. 
2. Add salt and pepper, peas, lentils, and broth to the pot. Bring to a boil, then lower the heat and let simmer, stirring often, until the peas are soft (about 40 minutes to 1 hour). 
3. Place about half of the soup in a blender or food processor and blend until smooth. Add it back to the pot and then add the lemon juice. 
4. Stir together and cook for about 10 minutes. 
5. Remove the bay leaves. 
6. Serve!


What's your favorite kind of soup?
Much love,


11.10.2011

Product Review: Whole Soy & Co. Yogurts & a GIVEAWAY!

What's your favorite sweet treat? 

I've always loved key lime. Key lime anything. Key lime cheesecake, key lime cookies, key lime cupcakes, key lime gum (yes, it exists!). The list goes on and on.

When I heard that Whole Soy & Co. released 2 new flavors of yogurt, I was excited, but when I heard one of those flavors was key lime... I was PUMPED. How good would it be? I had very high expectations.


When Whole Soy & Co. agreed to send me some flavors to try for a review, I couldn't be happier. I would get to try the new key lime flavor! Whole Soy & Co. also sent me three other flavors to try: blueberry, vanilla, and their new unsweetened plain.

First up, blueberry. 


This was pretty good. You could taste the blueberry flavor, but it did have a slight soy aftertaste. It was creamy, smooth, and had real blueberry pieces throughout the yogurt! Plus, it had a pretty light purple color. Overall, a pretty good choice for your morning yogurt. 

Next up, vanilla. 


This flavor was delicious. No soy after taste that I could recognize and a very strong vanilla flavor. I poured half the container over some freshly sliced strawberries and had a delicious afternoon snack. I think this would be very tasty on top of other fresh fruit or used in baking. Again, the yogurt was creamy and smooth. 

Third was the new unsweetened plain.


I was a little skeptical of how this would be before I tried it, but I was really surprised by just how much I enjoyed this. It was very tangy, and even though it was unsweetened and "plain," the yogurt did not lack flavor. It tasted similar to a runny sour cream with a subtle soy aftertaste. This would be great in baking (Did you see the recipe I posted for Carrot Raisin Sandwich Bread? I used this in the recipe!)

EDIT// I recently tried Whole Soy & Co's original Plain... and you know what? The Unsweetened Plain is much better! If you are debating between the two, I recommend getting the Unsweetened Plain! 

Finally... key lime. 


This was by FAR my favorite flavor. It met all of my expectations and even surpassed them. It tasted just like a key lime pie and had no soy aftertaste that I noticed. It was sweet, creamy, limey, and delicious. I don't enjoy when the key lime is subtle, and this yogurt DEFINITELY brought the punch with its strong lime flavor. Great job, Whole Soy & Co. You won me over with your key lime yogurt! I'm a fan! 

The Daisy Rating
4.5/5 Daisies

Now that you've heard me rave about their products, Whole Soy & Co. was kind enough to send me a bunch of coupons for free yogurt to offer to all of my lovely readers! So, you know what that means... it's time for a GIVEAWAY!!!

I will be giving away coupons for FREE Whole Soy & Co. yogurts to THREE LUCKY READERS! Each reader will receive: 

-2 coupons for a FREE 6oz. container of yogurt in any flavor
-1 coupon for a FREE 24oz. container of yogurt in any flavor 
-2 coupons for SAVE 25 CENTS on any 6oz. container of yogurt in any flavor
-1 coupon for SAVE $1.00 on any 24oz. container of yogurt in any flavor

That's a lot of free and discounted yogurt, right?! I thought so! Here's how to enter! 

1. (mandatory) Head on over to Whole Soy & Co.'s website and tell me what flavor of yogurt you would most want to try if you won! 

Extra entries can be earned by doing the following things and leaving a separate comment for each entry: 

2. Follow Whole Soy and Passing Daisies on Twitter
3. Like Whole Soy and Passing Daisies on Facebook 
4. Add Passing Daisies to your Google Reader or follow me on Blogger
5. Tweet the following: "@cityxlights13 I entered to win FREE @WholeSoy #organic and #vegan yogurts on Passing Daisies...you should enter too! http://bit.ly/nQkq1N"

Contest ends on TUESDAY, NOVEMBER 15,at MIDNIGHT (EST) and I will announce the winners on WEDNESDAY,  NOVEMBER 16. Get entering and convince all your friends to enter as well! 

Also, Whole Soy recently participated in the second annual Non-GMO Month (for October 2011) and posted some tips on why non-GMO is important and encourages you to learn all about the issue. Check out the post here. 

If your local retailer does not carry a certain flavor you wish to purchase, you can visit this link to find out how to request flavors at your retailer! Awesome! Go request the new key lime flavor! 

Wait are you waiting for? Get entering! 

Much love, 

11.04.2011

Pumpkin Seed Brittle

As I've mentioned before, fall is my new favorite season. Especially when the weather is cool, but not chilly or cold. When fall is here, I know it's time for one thing: giant corn mazes.

Although I still have yet to go to a corn maze this year, I always make great memories when I go. The first time I remember going was my sophomore year in high school. (5 years ago now...wow...I feel old!). I went with my friend P- and his girlfriend at the time, MBD, and my friend A-. I liked both A- and P-, but since A- was available, he was who I was going for. It was a beautiful night, it was cool, skies were clear, and I was in the company of good friends. And there was caramel apple cider. LOTS of caramel apple cider. 

I watched P- and MBD as they held hands and enjoyed their time on the hay ride. I sat with A- and we chatted and watched the stars. I thanked God for putting me here, in this place, in this moment.


Ever since that first trip to the giant corn maze, going to a corn maze has become somewhat of a fall tradition. We went nearly every year after that, and our usual group became P-, A-, my friend B-, and myself. It was our little clique.

We have since grown apart, although B is still one of my best friends and I talk to A- on occasion. Yet the idea of corn mazes lives on. Unfortunately, the farm we typically go to closed last year because of the drought, so we didn't get to go. I'm hoping it will be back and ready for action this fall (I still have to check).

Through all of this, I come back to one thing: caramel apple cider. I think of fall and corn mazes and I think of caramel apple cider. 

My cafeteria recently had a pumpkin decorating contest and gave out free pumpkins to those who wanted to participate. I signed up, took my pumpkin back to my room, and started carving my pumpkin. Then I realized... I could save the pumpkin seeds! And what do I love about fall? Caramel! Why not combine the two?

Therefore, I leave you with my recipe for Pumpkin Seed Brittle. I hope it brings you all the fall-goodness and deliciousness in the world!


Pumpkin Seed Brittle
Ingredients:
2 c. raw pumpkin seeds
1 T. Earth Balance
1 T. unsweetened almond milk
1/2 c. brown sugar
1/3 c. apple cider
2 t. cornstarch
1 T. + 1 t. water

Directions: 
1. In a small saucepan over medium heat, combine Earth Balance, almond milk, brown sugar, and apple cider.
2. In a small bowl, combine cornstarch and water until it is lump-free. Pour into caramel sauce, stir, and allow to come to a boil for a minute or two, then remove from the heat.
3. In a medium sized heat-proof bowl, combine caramel sauce and pumpkin seeds.
4. Pour pumpkin seeds onto a foil lined baking sheet that has also been sprayed with baking spray. THIS IS IMPORTANT. Grease your foil!!!
5. Bake in a 350 degrees oven for 30 minutes, or until the caramel has started to turn a dark brown and it sticky and thick.
6. Remove from oven and scrape seeds onto another cookie sheet that has also been lined with aluminum foil that has been greased. Flatten it out with a spatula and allow to cool until it hardens.
7. Once cool, cut or break brittle apart into pieces. It tastes like caramel popcorn! Delicious!

What is your favorite way to eat pumpkin seeds?
Much love,

10.30.2011

Vegan MoFo #30: Carrot Cake Lara Bars


This week, the secret ingredients for Iron Chef Vegan MoFo were carrots and oatmeal. Two interesting combinations, I think, but definitely do-able!

As I thought about what I wanted to make, only one thing kept popping into my head: carrot cake. But I didn't want to be that person who took the easy road and made something so... well, normal, however good it may taste. So I got creative.
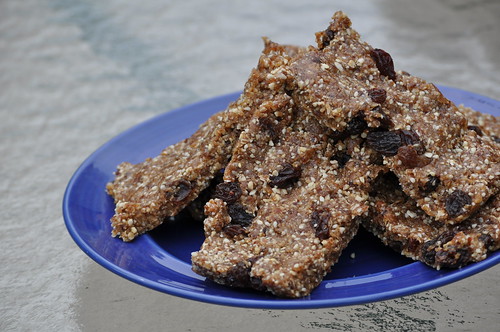
How about Carrot Cake Larabars? Everyone loves Larabars! (Unless you have a nut allergy, of course). Plus, they are easy to make because they don't require any baking.

Before we get into the actual recipe, let's have a little chat.

What did you think of Larabars the very FIRST time you tried them?

I tried my first Larabar many years ago, before I was a vegan. I hated dates. I hated EVERYTHING about dates. But I wanted to give Larabar a chance because they had a Key Lime Pie flavor, and I LOVE key lime pie flavored anything. I was really excited to find this new key lime delight, and I remember being extremely happy as I walked out to the car with my parents. Then I took a bite.

I could taste the dates.

I couldn't get over it. I wanted to like Larabars, I really did, but I just hated those stinkin dates.

I didn't eat Larabars again until, I think, I became a vegan. Not sure though. This time I loved them.. probably because I had grown up a bit and my tastes had changed. Now, I LOVE Larabars and everything about them. Seriously. I should be a Larabar spokesperson or something. (Larabar! Send me some bars to review!! Please? =D) 


My first attempt at making Larabars came out in my Oatmeal Raisin Cookie Bars, which have since been featured on Made Just Right!

Those were a huge success! So let's try my hand at another one, shall we?


Carrot Cake Larabars
Makes approximately 30 two inch squares.

Ingredients: 
1 c. shredded carrots
2 c. whole almonds
1 c. raisins
1/2 t. pumpkin pie spice
1 1/2 c. oats (sub gluten free oats if needed)
1/4 t. cinnamon
1/2 t. vanilla
1 T. agave

Directions:
1. In a food processor, blend almonds until they are in small pieces.
2. Add oats and blend until most of the oats have been broken down. You may want to leave some whole just for texture!
3. Add everything else and blend until it comes together into a sticky dough.
4. Push dough into a flat container and refrigerate for a few hours or until firm. I used a cookie sheet, but you could put this into a 8x8 cake pan for better form. This means your bars will be thicker, so you'll make fewer.
5. Remove from fridge and slice into desired shape. Enjoy!

So, what did you think of Larabars when you first tried them? What's your favorite flavor now?
Much love,